Showing posts with label how to. Show all posts

How to Build a Mini Hoop Greenhouse

I would love to live in an area where it was warm all year round. Because I live on Prince Edward Island, although extremely beautiful in the summer, my growing season isn't nearly as long as I would like. I have to wait until the end of May, beginning of June to put out tomato, pepper and other transplants. I started doing research on how I can get the most from my garden.

One of the ways was to build a mini hoop greenhouse. You can do this too, and here's how:

Supplies:

PVC or PEX piping
Rebar or U clips if you have boards around your garden
Heavy Duty Painters Plastic (3.5ml)
Rocks, bricks or heavy sticks
Clothespins
Thermometer

Time spent: less than an hour


First

-After prepping and tilling garden (which had been done on an earlier day), measure garden. This is our side garden and it measures 20'x4'.


Second

-Measure out where your rebar will be placed. It can be placed 3-4 feet apart. I used 1 foot rebar for our posts. It's cheaper, I found, to buy a long piece of rebar and have it cut to size, than to buy the sizes that I needed. It saves you about 45% doing it this way.

-Stick rebar in the ground until only a few inches are shown.

 Third

-Take your PVC or PEX piping measure and cut with a hacksaw where you need it.

- I found it cheaper to buy it in a 50 ft length and cut it myself, than to buy it cut already. About 1/2 price.

-Be careful when cutting it! We don't want any ER visits from this project!


Fourth

-Measure all pieces the same size. This is where some help comes in handy. I had some very cute help helping me through this project.


 Fifth

-Take piping and insert into rebar on either side of the garden. It's so easy a child could do it!


Sixth

-Open your painters' plastic and spread it over your hoop house to see if you need to trim any off. Because of the size of my garden, I didn't need to cut any.


Seventh

-Pull the plastic tight around the hoops. Draw it from the sides to the front and fold under. Here's where you need the heavy rocks, bricks, sticks or whatever. Use the rocks to hold it in place. I also placed it around the sides to have extra protection from the wind as it can get fairly windy on this Island.

Eighth

- Place a thermometer inside your hoophouse and monitor the temperature for a couple of days before putting transplants inside. Keep an eye on the temperature. Mine was up to 44 degrees Celsius  one day and it was only 15 outside. If you need to cool your hoop house down, just use the clothespins to pin up the opening on either end to let the air go through. Remember to keep a watch on the temperature when the house is open as well. 

I would love to see your hoop house! Send a picture to our email: fighting2bfrugal @ yahoo dot ca,  or pop on over to our Facebook page and share it there!

How to Bake Bread

It's amazing the things that you take for granted. I love homemade bread. I can remember my mom and Nanny Pat making bread when I was a small child. I go to my MIL's home and there is generally always homemade bread there. My dad won a bread maker at one point and he started making his bread that way. My parents gave me a bread maker for our wedding present ions ago and that was my start to making my own bread.

However, soon enough it wasn't enough to have one loaf being made, it was gone as quickly as it baked and homemade bread still tasted better than bread maker bread or boughten bread. (Yes, boughten is a word. It's a colloquial saying from the south shore of Nova Scotia where I grew up. You either had homemade bread or boughten bread [which would be the store bought bread]. In our home, boughten bread is the treat.) I soon went to my MIL to relearn how to make bread.

I have figured out that when I make my own bread it costs around 50 cents a loaf and takes me about 2 and a half hours from start to finish to make it. That's when I don't have any extra little hands helping me. It sure takes a lot of extra time when they do help, but it's also a tad more fun.

Baking bread is one of the easiest ways to save money. It really doesn't take much time, one evening a week while you are watching tv. Really. Think about how much you spend on a loaf of bread, how much a week, a month a year. Then figure out how much you would save if you baked your own bread, about 50 cents a loaf is how much it costs to make it, and see what you are saving in a year. You'll be pleasantly surprised at how much you save and how easy it is to do.

The recipe that I share with you is my MIL's. It makes 3 loaves at a time, I double it for my family so that I only have to make bread once a week. Please remember that when you see the 6 loaves at the end of the post.

Recipe:

3 cups warm water (too hot and your yeast won't rise, warm to your wrist)
3 tbsp yeast
1/3 cup sugar

3 tsp salt
2 eggs
1/2 cup oil

7-8 cups of flour (maybe more, depends on your consistency)

To start with you need a big bowl, water, yeast and sugar.
My bowl is huge because of the 6 loaves I make. It only fits on top of the fridge, it was one of my favourite Christmas presents several years ago. I buy my yeast in the biggest package available and then keep it in the freezer in a resealable bag. It keeps the yeast fresh longer and it's cheaper to buy it this way.

Place water, sugar and yeast in bowl and let sit for 10 minutes. It looks like this when you put it in the bowl:
And like this 10 minutes later:

To this, add your eggs, salt and oil. Yes I said two eggs in the recipe and the picture shows four eggs, but remember, I doubled my recipe. I buy my oil at costco when someone heads over there as it's the cheapest place that I can get a large quantity of it. I also get my white flour there.
Mix together with your mixer:
To this we will add our flour a cup at a time. Mix it with your mixer until it won't handle it any more. Then use your rubber spatula to mix it in. With my kitchen aid, I only have to knead in one cup at the end. 
When that won't work it's time for your fists!
Keep adding flour until it gets to your desired consistancy. Then oil your bowl (rub oil all around the inside of your bowl that you are going to let your dough rise in. It can be the same bowl that you mixed the dough in.)
Cover it and place it somewhere warm and draft free to rise. It can be in your oven and you can set it at the lowest temperature and it will rise nicely. I set mine by the wood stove and it rises rather quickly.
Once it has doubled it's height (about 30 mins here), take it back to your spot and punch it down.
You are almost done. If you are not using non stick loaf pans, you need to spray, oil or whatever you do to your bakeware before you put your dough in the pan. At this point you are going to divide your dough into three sections and roll them under so all the rough edges are at the bottom. I apologize, but I don't have a picture of this step as I had to use two hands to do it and had no one else to take the picture.
I hope you are able to understand from the next picture what I mean.
Cover once again and place in that nice spot you had last time.
When it has doubled in size it's ready to bake.
This is what it looks like going into the oven.
30-40 mins later after being baked in an oven at 350 degrees fahrenheit, it looks like this:
I usually rotate my bread about half way through the bake time so that it browns evenly.

You know it's done because all sides are toasty brown and it sounds hollow when you knock on it. Once it cools a bit, remove it from the pans and allow to cool on racks. You can butter the top if you wish. Once cool, bag to keep the moisture in and freeze what you don't use so that it stays fresh.

Now when I was growing up and at my grandmother's, I can remember her serving me fresh hot bread with butter and molasses on it. Have you ever tried it? I am told that it is definitely an east coast thing. If you haven't, I strongly suggest you try it. So good.

How to keep your cool on a hot day.

Thankfully, summer has arrived. We have had a very cold, wet spring here and I am so glad that summer and it's sun and heat are here. Now, I know there are people out there that aren't so happy with the heat, and maybe you can't afford or don't want air conditioning in your home. Here are some of the ways that we use in our home to keep it nice and cool without air conditioning  -even when the humidex is reading 32 degrees C.

-first thing in the morning open all of the windows in the house full height

-all fans go on to high setting and are set in front of the window to draw in the morning cool air

-windows are then closed about after an hour or two (or when you leave for work) and fans stay on

-once the sun starts coming around to the side with the windows, blinds and curtains are closed to keep the sun out

-once the sun starts to go down, the windows are opened again and cool air comes in

-some days when it's really too hot and it's starting to get warm inside anyway, we set a bowl of ice in front of a fan and it blows the cool air from the melting ice around the house and it cools down

-cook outside on your bbq or place your slow cooker even outside, just don't use the appliances inside. Even the slow cooker puts off heat and can slowly warm the house up

-use the clothesline instead of the dryer (smells better and more environmentally friendly)

-keep lights off in the house, these carry small amounts of heat also and it will stay cooler when it's not bright

-put your feet in a pan, or a kiddie pool, of cool water. All of your blood goes through your feet in thirty minutes they say, and it will cool you down quickly.

What do you do to keep your house cool on a hot day?

Enjoy your day!

How To Make Bread and a CONTEST!

It's amazing the things that you take for granted. I love homemade bread. I can remember my mom and Nanny Pat making bread when I was a small child. I go to my MIL's home and there is generally always homemade bread there. My dad won a bread maker at one point and he started making his bread that way. My parents gave me a bread maker for our wedding present ions ago and that was my start to making my own bread.

However, soon enough it wasn't enough to have one loaf being made, it was gone as quickly as it baked and homemade bread still tasted better than bread maker bread or boughten bread. (Yes, boughten is a word. It's a colloquial saying from the south shore of Nova Scotia where I grew up. You either had homemade bread or boughten bread [which would be the store bought bread]. In our home, boughten bread is the treat.) I soon went to my MIL to relearn how to make bread.

I have figured out that when I make my own bread it costs around 50 cents a loaf and takes me about 2 and a half hours from start to finish to make it. That's when I don't have any extra little hands helping me. It sure takes a lot of extra time when they do help, but it's also a tad more fun.

Baking bread is one of the easiest ways to save money. It really doesn't take much time, one evening a week while you are watching tv. Really. Think about how much you spend on a loaf of bread, how much a week, a month a year. Then figure out how much you would save if you baked your own bread, about 50 cents a loaf is how much it costs to make it, and see what you are saving in a year. You'll be pleasantly surprised at how much you save and how easy it is to do.

The recipe that I share with you is my MIL's. It makes 3 loaves at a time, I double it for my family so that I only have to make bread once a week. Please remember that when you see the 6 loaves at the end of the post.

Recipe:

3 cups warm water (too hot and your yeast won't rise, warm to your wrist)
3 tbsp yeast
1/3 cup sugar

3 tsp salt
2 eggs
1/2 cup oil

8-10 cups of flour

To start with you need a big bowl, water, yeast and sugar.

My bowl is huge because of the 6 loaves I make. It only fits on top of the fridge, it was one of my favourite Christmas presents several years ago. I buy my yeast in the biggest package available and then keep it in the freezer in a resealable bag. It keeps the yeast fresh longer and it's cheaper to buy it this way.

Place water, sugar and yeast in bowl and let sit for 10 minutes. It looks like this when you put it in the bowl:

And like this 10 minutes later:


To this, add your eggs, salt and oil. Yes I said two eggs in the recipe and the picture shows four eggs, but remember, I doubled my recipe. I buy my oil at costco when someone heads over there as it's the cheapest place that I can get a large quantity of it. I also get my white flour there.

Mix together with your mixer:

To this we will add our flour a cup at a time. Mix it with your mixer until it won't handle it any more. Then use your rubber spatula to mix it in.

When that won't work it's time for your fists!

Keep adding flour until it gets to your desired consistancy. Then oil your bowl (rub oil all around the inside of your bowl that you are going to let your dough rise in. It can be the same bowl that you mixed the dough in.)

Cover it and place it somewhere warm and draft free to rise. It can be in your oven and you can set it at the lowest temperature and it will rise nicely. I set mine by the wood stove and it rises rather quickly.

Once it has doubled it's height (about 30 mins here), take it back to your spot and punch it down.

You are almost done. If you are not using non stick loaf pans, you need to spray, oil or whatever you do to your bakeware before you put your dough in the pan. At this point you are going to divide your dough into three sections and roll them under so all the rough edges are at the bottom. I apologize, but I don't have a picture of this step as I had to use two hands to do it and had no one else to take the picture.

I hope you are able to understand from the next picture what I mean.

Cover once again and place in that nice spot you had last time.

When it has doubled in size it's ready to bake.

This is what it looks like going into the oven.

30-40 mins later after being baked in an oven at 350 degrees fahrenheit, it looks like this:
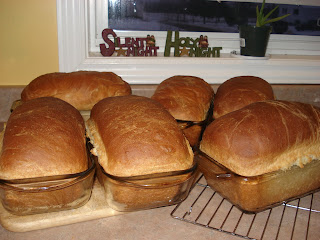
I usually rotate my bread about half way through the bake time so that it browns evenly.

You know it's done because all sides are toasty brown and it sounds hollow when you knock on it. Once it cools a bit, remove it from the pans and allow to cool on racks. You can butter the top if you wish. Once cool, bag to keep the moisture in and freeze what you don't use so that it stays fresh.

Now when I was growing up and at my grandmother's, I can remember her serving me fresh hot bread with butter and molasses on it. Have you ever tried it? I am told that it is definitely an east coast thing. If you haven't, I strongly suggest you try it. So good.

If you try this out, I would love to hear from you. Please comment below and tell us how it went. Better yet, a contest. Once you have baked your bread, email me a photo and your story of how it went to smile_zil at yahoo dot ca and I will enter you in for a freebie, a recipe book from our Island. It's open to everyone worldwide and you have until January 20th to enter. Can't wait to see your bread! If you make a different kind of bread, please send the recipe and directions as well. All photos will be posted at the end of the contest (should you send them, hint, hint) and the winner announced on the 21st of January.